
You stare at your aquarium. The green fuzz on the glass is thriving, but your stem plants are melting. The moss you carefully tied to driftwood has turned brown. You have bought three different bottles of fertilizer in six months, and your wallet is lighter, but your plants are not. You know you want lush, vibrant growth, but the price tags on specialized fertilizers feel like a scam. The problem is simple: you are either spending too much or using the wrong stuff. The solution is smarter shopping and DIY strategies. You do not need a chemistry degree or a second mortgage to grow a stunning underwater garden. You just need to know where to cut costs without cutting corners. This guide will walk you through exactly how to achieve lush aquarium plants with cheap fertilizers that actually work.
What Does a Cheap Aquarium Fertilizer Actually Need to Contain?
A cheap fertilizer is only cheap if it actually feeds your plants. Most budget options lack the micronutrients that plants require for photosynthesis and cell growth. To get lush results without spending much, you must look for three essential nutrient groups: macronutrients, micronutrients, and carbon sources. Without these, your plants will starve even if you dose daily.
Macronutrients: The Big Three Plants Cannot Ignore
Nitrogen, phosphorus, and potassium form the backbone of plant nutrition. Nitrogen drives leaf growth and green color. Phosphorus supports root development and energy transfer. Potassium regulates water pressure and enzyme activity. Cheap fertilizers often skimp on potassium, leaving your plants with pinholes and yellow edges. Look for products that list K at a level close to N and P. Generic NPK 10-10-10 or 20-20-20 water-soluble garden fertilizers work perfectly if they lack copper or zinc in toxic levels. A bag costs under ten dollars and lasts a year.
Micro-Nutrients: The Secret to Vibrant Colors
Iron, manganese, boron, zinc, and molybdenum are needed in tiny amounts but make a massive difference. Iron is the most critical. If your new leaves come in pale or white, you have an iron deficiency. Many cheap aquarium fertilizers skip iron entirely or use a form that oxidizes quickly. Look for chelated iron (Fe-EDTA or Fe-DTPA). A dedicated iron supplement is often the cheapest single purchase you can make to green up your tank immediately.
Carbon: The Missing Piece of the Puzzle
Plants are mostly carbon, and they get it from CO2. Without enough carbon, fertilizers are wasted. You do not need a pressurized CO2 system. Liquid carbon products (like glutaraldehyde-based solutions) cost a few dollars per bottle and can be dosed drop by drop. They also act as an algaecide. This is the cheapest way to provide the carbon that makes your fertilizers work efficiently.
Why Are Most Budget Fertilizers a Waste of Money?
The aquarium industry thrives on confusion. Many budget fertilizers are simply diluted water with a few cheap salts. They look affordable at first glance, but the concentration is so low that you need triple the recommended dose. This makes them more expensive per dose than premium brands. You need to learn how to read the label to avoid this trap.
Dilution Tricks That Empty Your Wallet
Some brands sell a 500ml bottle for five dollars, which feels like a steal. But the nitrogen content might be 0.01%. To hit the required level for a medium-light tank, you would need to pour the entire bottle into the tank every week. Compare this to a concentrated dry salt that costs ten dollars and lasts two years. The cheap liquid is actually the expensive option. Always check the guaranteed analysis on the label, not just the price.
The Problem with All-in-One Products
All-in-one fertilizers try to cover everything, but they usually fail at everything. The ratio of nutrients is fixed. If your tank needs more potassium but less phosphate, you are stuck. You either over-dose phosphate to get enough potassium, or you under-dose everything. This imbalance leads to algae blooms. A better approach is to buy two or three single-ingredient products and mix them yourself. This sounds harder than it is, and it saves a lot of money.
How Can You Make Your Own Affordable Fertilizers at Home?
Making your own fertilizer is the absolute cheapest way to get lush plants. It costs pennies per batch and gives you precise control. You need four basic ingredients, all available online or at garden centers. This approach is used by many serious hobbyists who grow award-winning aquascapes on a budget.
Step-by-Step: Mixing a DIY Macro Fertilizer
Start with potassium nitrate (KNO3), monopotassium phosphate (KH2PO4), and potassium sulfate (K2SO4). You can buy these as dry powders. Mix them according to a simple recipe: 10g KNO3, 2g KH2PO4, and 5g K2SO4 into 500ml of distilled water. Shake well. Dose 1ml per 10 gallons of tank water twice a week. This gives you a balanced NPK plus extra potassium. The cost is approximately two dollars per year.
DIY Micro-Nutrient Mix Using Houseplant Fertilizer
Buy a water-soluble houseplant fertilizer that contains chelated micro-nutrients. Brands like Schultz or Miracle-Gro work if you use one-tenth of the recommended dose. Mix a pinch the size of a pea into 500ml of water. Dose 1ml per 10 gallons once a week. This provides iron, manganese, and zinc. Always test with a single dose first to ensure your shrimp or fish do not react. Most are completely safe at these low levels.
Which Store-Bought Fertilizers Are Actually Worth the Price?
Not all store-bought fertilizers are overpriced. Some niche brands offer concentrated solutions that are cost-effective per dose. You just have to know which ones to pick. The key is to look for products that sell dry salts or highly concentrated liquids.
Dry Salt Brands That Save You Money
Brands like Green Leaf Aquatics (GLA), NilocG, and Aquarium Co-Op offer dry salt blends. These are simply the raw ingredients mixed in the correct ratios. A 500g bag of comprehensive fertilizer costs about twenty dollars and will treat a 50-gallon tank for over a year. That is cheaper than most liquid brands by a factor of ten. These are the best options when you search for lush aquarium plants cheap fertilizers.
How to Calculate Cost Per Dose
Always convert the price to cost per milliliter of the working solution. Take the total price, divide by the number of doses in the bottle, then multiply by your weekly dose. This gives you the true monthly cost. Many premium liquids cost 0.50 to 1.00 per month for a 10-gallon tank. Cheap liquids can cost 2.00 to 3.00 per month because you use more. Dry salts cost 0.05 to 0.10 per month.
Can You Use Garden Fertilizer in Your Aquarium Safely?
Yes, you can, but you must be careful. Garden fertilizers often contain copper, zinc, or urea, which are toxic to fish and invertebrates. They also release nitrogen too quickly. However, with proper selection and dosing, they work beautifully and are incredibly cheap.
Which Garden Fertilizers Are Safe for Fish?
Look for products labeled as water-soluble and containing only ammonium nitrate, potassium phosphate, and potassium sulfate. Avoid anything with urea, ammonium sulfate, or copper sulfate. Dyna-Gro and General Hydroponics make safe options. You can also use Osmocote Plus pellets buried in the substrate. These slow-release pellets feed roots for months. A container costs seven dollars and can service three tanks for a year.
How to Dose Garden Fertilizers Without Killing Your Fish
Start with one-quarter of the recommended dose for terrestrial plants. Observe your fish for signs of stress, such as gasping at the surface or clamped fins. Monitor your ammonia levels for 24 hours. If everything remains stable, gradually increase to half the recommended dose. Never dose garden fertilizers in a tank with sensitive fish like discus or wild-caught species unless you have tested the exact formula.
When Should You Dose Fertilizers for Maximum Effect?
Timing is everything. Dosing at the wrong time can cause algae blooms or nutrient lockout. Plants absorb nutrients most efficiently during their photosynthesis window. You need to match your dosing schedule to your lighting schedule.
The Golden Rule: Dose Right After Lights On
Within the first hour of your lights turning on, plants are ready to absorb nutrients. If you dose at night, the nutrients sit in the water column for hours without being used. This encourages algae. Dose your macro and micro fertilizers within thirty minutes of your lights starting. If you have a siesta period, dose again after the break.
Dosing Frequency: Daily vs. Weekly
Daily dosing mimics natural conditions and prevents nutrient spikes. However, weekly dosing is more convenient. For low-tech tanks with slow growth, weekly dosing works fine. For high-tech tanks with CO2 injection, daily dosing is better. Split your weekly dose into seven equal parts. This keeps nutrient levels stable and reduces the risk of algae.
How Do You Avoid Algae When Using Cheap Fertilizers?
Algae is the number one reason people give up on cheap fertilizers. The nutrients feed algae just as much as plants. The trick is to balance light, carbon, and nutrients. If one is out of sync, algae wins. Cheap fertilizers are not the problem; poor management is.
The Three-Bottle Rule: Light, CO2, and Fertilizers
Imagine three bottles: one for light, one for CO2, and one for fertilizers. If you fill all three to the top, your plants grow fast and clean. If you fill one bottle less than the others, algae fills the gap. Always match your fertilizer dose to your light intensity and CO2 level. Low light means less fertilizer. High light with CO2 means more fertilizer. Never add extra fertilizer thinking it will help; it will only feed algae.
How to Spot a Nutrient Imbalance Before Algae Starts
Watch your plants. If older leaves turn yellow, you need more nitrogen. If new leaves are stunted, you need more calcium or iron. If leaves have pinholes, you need more potassium. Address the specific deficiency with a targeted cheap supplement rather than dumping a general fertilizer. This prevents excess nutrients that cause green water or hair algae.
Is Substrate Fertilizer Necessary for Lush Plants?
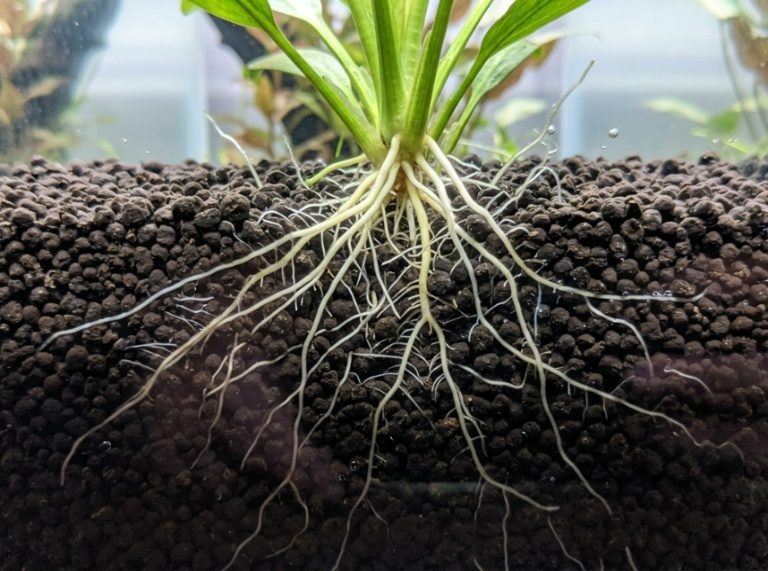
No, but it helps a lot. Root tabs provide nutrients directly to the roots of stem plants and root feeders like crypts and swords. Without them, you must rely entirely on water column dosing. This works for floating plants and mosses, but rooted plants grow thicker and greener with substrate fertilizers. The cheapest option is to make your own root tabs.
DIY Root Tabs Using Clay and Fertilizer
Buy unscented, non-clumping clay kitty litter (make sure it is 100% bentonite clay). Mix a teaspoon of Osmocote Plus or DIY dry salts into a cup of clay. Add water slowly until it forms a dough. Roll into small balls. Bake at 200°F for 30 minutes to harden. Bury one ball near each root-feeding plant. These tabs cost pennies each and last three to four months.
When to Add Root Tabs for Best Results
Add root tabs when you first plant the tank, then again every 8-12 weeks. Push them deep into the substrate, at least two inches down. If you place them near the surface, the nutrients leach into the water column and feed algae. Heavy root feeders like Amazon swords and crypts will double in size within a month of receiving root tabs.
How to Measure Success Without Expensive Test Kits
You do not need a full API test kit to know if your cheap fertilizers are working. Plant health is the best indicator. However, a few inexpensive tests can help you avoid major problems. A TDS meter (total dissolved solids) costs ten dollars and tells you if your nutrient levels are in the right ballpark.
Using Plant Leaves as Your Primary Meter
Healthy leaves are firm, bright green, and free of holes or yellow patches. If your plants look good, your fertilizer routine is working. If you see problems, look at the oldest leaves first. Deficiencies usually show up on old growth. Adjust your dosing based on these visual cues. This saves you from buying expensive test kits for every nutrient.
The Cheap Phosphate and Nitrate Test
If you want some data, buy only two test strips: phosphate and nitrate. These two are the most common to over-dose with cheap fertilizers. Keep nitrate below 20 ppm and phosphate below 2 ppm. If either is too high, reduce your dosing by half for a week. These strips cost five dollars for 50 tests and last a long time,Just as organizing property documents in a Real Estate Binder Explained keeps your investments seamless, planning your aquarium layout before planting saves you from costly mistakes later.
Frequently Asked Questions
Can I use aquarium salt as a fertilizer?
No. Aquarium salt (sodium chloride) does not provide essential plant nutrients. It can actually harm freshwater plants by dehydrating the cells. Never use table salt or aquarium salt as a fertilizer replacement.
Are there any cheap liquid fertilizers that work well?
Yes. Seachem Flourish Comprehensive Supplement is moderately priced and effective for micronutrients. For macros, look for dry salt blends from brands like NilocG. These offer the best value per dose.
How often should I change water when using cheap fertilizers?
Weekly water changes of 25-30% are essential. Cheap fertilizers can build up excess nutrients that cause algae. Regular water changes reset the balance and keep your water chemistry stable.
Can I make fertilizer from kitchen scraps?
You should not. Kitchen scraps like banana peels or eggshells decompose unpredictably and can spike ammonia. They also attract pests. Stick to safe, predictable ingredients like dry salts or diluted houseplant fertilizers.
Do I need CO2 injection to use cheap fertilizers?
No. You can achieve lush growth with low light and liquid carbon (glutaraldehyde). Without any carbon source, your plants will grow slowly but should still stay green with proper fertilization. For dense carpets, CO2 helps but is not mandatory.
What is the biggest mistake beginners make with cheap fertilizers?
Overdosing. Beginners think more fertilizer equals faster growth. In reality, excess nutrients feed algae. Start with half the recommended dose and increase slowly based on plant response. Patience is the cheapest fertilizer you can buy.
Can cheap fertilizers kill my shrimp?
Some can. Shrimp are sensitive to copper and heavy metals. Always check the label for copper sulfate. Use shrimp-safe brands or DIY mixes with known ingredients. Dose conservatively and watch for molting issues.
Growing lush aquarium plants on a budget is not about finding a miracle product. It is about understanding what your plants actually need and buying or making those specific ingredients without paying for fancy packaging or watered-down formulas. Dry salts, DIY root tabs, and careful dosing give you the same results as expensive commercial lines for a fraction of the cost. Start with the basics: buy a bag of potassium nitrate and a bottle of chelated iron. Use them consistently with proper lighting and carbon. Your plants will respond within weeks. The lush underwater garden you dream of is absolutely achievable without spending much. Stop overthinking and start dosing smart.





+ There are no comments
Add yours