
Most surfers spend a lot of time thinking about waves, wax, and fins — but not nearly enough about storage. Improper storage at home is one of the leading causes of dings, pressure dents, delamination, and yellowing on surfboards. The good news is, with the right surfboard storage rack and a few simple habits, you can protect your board for years to come.
Here’s how the pros do it.
Why Proper Storage Matters
Your surfboard is a precision tool. It’s made from fiberglass, foam, epoxy, or polyester — all materials that can be damaged by:
- Heat — warps the shape and causes delamination
- UV light — yellows the foam and weakens the resin
- Pressure — creates flat spots and pressure dents
- Moisture — causes dings to expand and foam to rot
Knowing this, your storage solution needs to address all four of these threats.
The Best Home Surfboard Storage Options
1. Wall Mount (Most Recommended)
A wall-mounted surfboard storage rack is the #1 choice for home surfboard storage. Here’s why:
- Gets the board off the floor and away from foot traffic
- Keeps pressure evenly distributed along the rail
- Saves floor space
- Looks amazing — your board becomes wall décor
For single-board households, a simple two-arm wall mount is perfect. For multiple boards, consider a vertical rack or stacked horizontal mounts.
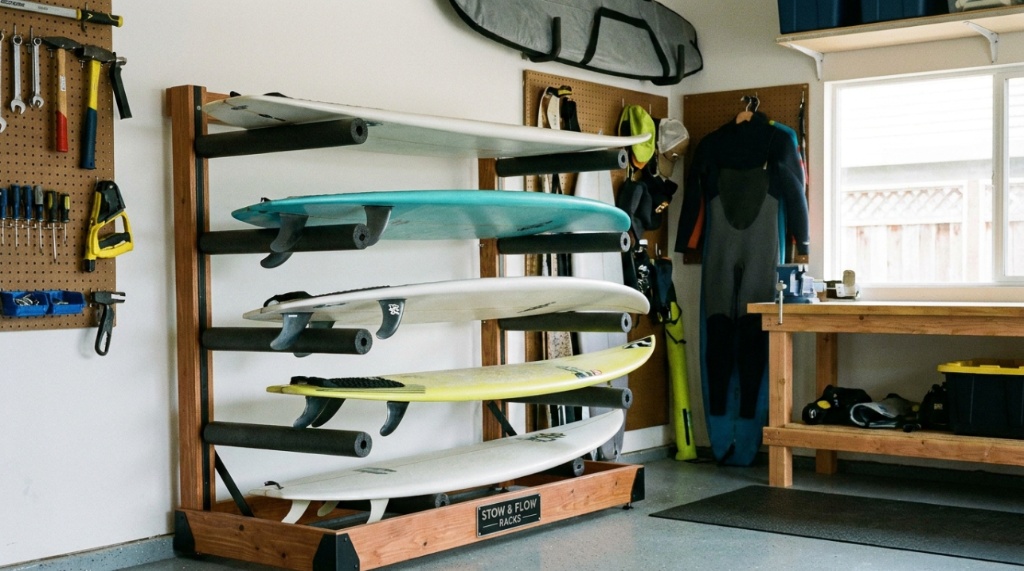
2. Freestanding Rack
If you can’t drill into walls (renters, take note), a freestanding floor rack is your next best option. These typically hold 3–6 boards vertically and can be placed in a garage, shed, or spare room.
Pros: No drilling, portable, holds multiple boards Cons: Takes up floor space, boards can lean and tip if not secured
3. Ceiling Mount
Ceiling mounts use pulley systems to hang your board overhead. This is ideal for garages with high ceilings.
Pros: Completely out of the way Cons: Harder to install, less accessible for daily use
4. Under-Bed Storage Bags
For shortboards and small fish boards, a padded storage bag under the bed works surprisingly well for home surfboard storage.
Step-by-Step: Setting Up Your Home Storage System
Step 1: Choose your location Pick a spot away from direct sunlight and heat sources. Garages can get very hot — if that’s your only option, use a board bag for extra protection.
Step 2: Check your walls or floor For wall mounts, locate studs using a stud finder. Mounts screwed directly into studs are far more secure than those using only drywall anchors.
Step 3: Install the mount or rack Follow the manufacturer’s instructions carefully. Use a level to make sure your arms are even — an uneven mount puts unequal pressure on the board’s rails.
Step 4: Rinse and dry your board before storing Salt water and sand are corrosive over time. Always rinse your board with fresh water after every session and let it dry completely before putting it on the rack.
Step 5: Remove wax periodically Old wax can get tacky and dirty, especially in warm storage areas. Remove and reapply fresh wax every few months.
Pro Surfer Tips for Long-Term Board Health
- Use a board sock or bag even on a wall mount — keeps dust and light off the board
- Never store nose-down — puts pressure on the most delicate part of the board
- Keep fins on when possible — removing and reattaching fins repeatedly wears out the boxes
- Store away from lawn equipment or bikes — accidental dings are more common than you’d think
- Don’t stack boards on top of each other without padding between them
Signs Your Storage Setup Is Hurting Your Board
Watch for these warning signs:
- Pressure dings along the rails (mount arms too narrow or too hard)
- Yellow patches on the foam (UV exposure)
- Delamination bubbles (heat damage)
- Musty smell (moisture trapped inside a ding)
If you notice any of these, it’s time to upgrade your home surfboard storage setup immediately.
Storing your gear properly ensures it stays in pristine shape for your next session, but protecting your equipment is only half the battle. True progression requires resilience both on land and in the water. Once your gear is safely tucked away, it is equally important to master the mental and physical skills needed to handle tough wipeouts so you can confidently get back on your board after wiping out like a pro.
Conclusion
Storing your surfboard properly at home doesn’t require a fancy setup or a lot of money. A quality surfboard storage rack, a good location away from heat and sunlight, and a few simple habits are all it takes to keep your board in peak condition for years. Treat your board well, and it’ll reward you with more great sessions in the water.


+ There are no comments
Add yours